 فارسی
فارسی


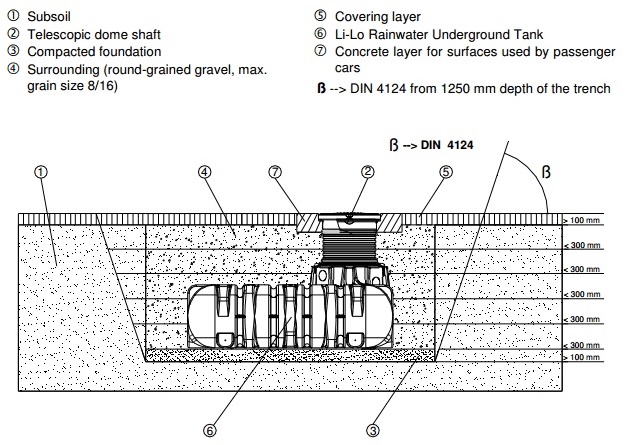
نصب مخزن زیر زمینی
1. زیر خاکی
2. نگهدارنده کلاهک تلسکوپی
3 . فشردهسازی با خاک نرم کوبیده (فشردهسازی)
4. فضای اطراف (شن دانه گرد، حداکثر اندازه دانه 16/8)
5. لایه پوشاننده
6. مخزن زیر زمینی آب باران
7. صاف کردن با لایههای بتنی جهت عبور ماشینآلات
Underground water tanks are great if you want to harvest rainwater and not
have valuable surface space being taken up .
اگر به لحاظ مکان برای نصب و استفاده از مخزن ذخیره آب با محدودیت مواجه هستید، نصب مخازن به صورت زیر زمینی انتخابی مناسب برای شما محسوب میشود.
Under all circumstances, the following points must be clarified prior to installation: The structural suitability of the ground according to DIN 18196 Maximum groundwater levels which occur and drainage capability of the subsoil Types of load which occur, e.g. traffic loads An expert ground report should be requested from the local planning authority to determine the physical characteristics of your subsoil .
اصول نصب میبایست تحت هر شرایطی به درستی اجرا شوند: بررسی جنس، نوع و میزان استقامت خاک محل قرارگیری مخزن، امکان زهکشی لایههای زیرین با توجه سطح آب زیر زمینی، بررسی میزان تحمل مخزن و فشار مکانیکی وارد شده و بررسی وضعیت فیزیکی زمین توسط متخصصین و سازمانهای زیربط از نکات ضروری در نصب مخازن به روش زیر زمینی هستند.
To ensure that sufficient space is available for working, the base area of the trench must exceed the dimensions of the tank by greater than 100 mm on each side; the distance from solid constructions must be at least 1000 mm .
برای کسب اطمینان از وجود فضای مناسب جهت نصب مخزن میبایست برای سطح زیرین مخزن، فاصلهای حدود 100 میلیمتر بیشتر از ابعاد خود مخزن در نظر گرفته شود. این میزان فاصله برای دیوارههای حفره حداقل 1000 میلیمتر است.
If the depth of the trench is > 1250 mm an embankment must be designed according to DIN 4124. The construction site must be horizontal and plane and must guarantee sufficient load-bearing capacity .
چنانچه عمق حفره بیشتر از 1250 میلیمتر باشد، عملیات خاکریزی باید مطابق شکل DIN 4124 انجام شود. به منظور تحمل سنگینی فشار وارد شده بر خاک، حفره باید به صورت افقی و صفحهای هموار گردد.
The depth of the trench must be dimensioned so that the maximum earth coverage above the tank is not exceeded. To use the system throughout the entire year, it is necessary to install the tank and those parts of the system which conduct water in the frost-free area. The frost-free depth is usually approximately 600 mm – 800 mm; precise information in this regard can be obtained from the responsible authority .
عمق حفره باید به گونهای باشد که از حداکثر پوشش خاکی بالای مخزن فراتر نرود. توجه به محل قرارگیری مخزن و اتصالات آن برای جلوگیری از یخزدگی در طول سال بسیار ضروری است. حدود 600 الی 800 میلیمتر عمق برای جلوگیری از یخزدگی مخزن الزامی است.
A layer of compacted, round-grain gravel (grain size thickness approximately 100 – 150 mm) is applied as the foundation.
از یک لایه خاک نرم کوبیده (سنگریزه فشرده)، شن ریزه با ضخامت بین 100 الی 150 میلیمتر برای همواره سازی بخش زیرین (پایهها) مخزن استفاده کنید.
Connecting Multiple Tanks
Two or more tanks are connected via the assembly surfaces by means of GARANTIA special seals and basic pipes. The apertures must be drilled to the corresponding size using only the GARANTIA special crown bit. It must be ensured that the distance between the tanks is at least 500 mm. The pipes must project at least 200 mm into the tanks .
نحوه اتصال هم زمان چند مخزن
برای نصب دو یا چند مخزن در یک حفره میبایست از اتصالات استاندارد و اصول گارانتی استفاده کنید. سوراخ کردن مخزن جهت نصب اتصالات نیز باید متناسب با استانداردهای درج شده در گارانتی انجام پذیرد. در نظر گرفتن فاصله 500 میلیمتری برای مخزن و 200 میلیمتری برای محل قرارگیری لولهها درون مخزن ضروری است.
 Insertion and Filling Hole
The tanks must be inserted, impact-free, into the prepared trench using suitable equipment.To avoid deformities, the tank is filled one-third full with water before filling in the tank surrounding. Afterwards the surrounding (round grain gravel of 100–150mm thickness) is then filled in layers of at most 300mm. 30 cm steps and is compacted .
سوراخ کردن و آبگیری مخزن
الزامی است تا مخازن با بهترین تجهیزات و بدون کوچکترین آسیب در حفره قرار بگیرند. برای جلوگیری از تغییر شکل بدنه، میبایست حدود یک سوم مخزن را آبگیری نمایید. با اتمام آبگیری و قرار دادن مخزن در حفره میتوانید از شن ریزههای نرم با ضخامت 100 الی 150 میلیمتر لایههایی 300 میلیمتری از اطراف مخزن را پر کنید.
 Note: The individual layers as well as the medial support column must carefully well compacted with manual tampering to avoid damage to your tank. Mechanical compaction machines must not be used under any circumstances. The surrounding towards the trench must be at least 100 mm wide.
نکته: لایههای جداگانه و ستون پشتیبان میانی باید با دقت و به صورت دستی (بههیچعنوان از ماشینآلات تراکم مکانیکی استفاده نشود) فشرده شوند تا از آسیب دیدن به بدنه مخزن زیر خاک جلوگیری شود. محیط اطراف حفره میبایست حداقل 100 میلیمتر عرض داشته باشد.
 sloped surface
if tank is positions in ground less than 5 metres of slop a statically calulated supporting wall must be evected to absorb the soil pressure. the wall must exceed the dimensions of the tank by at least 500 mm in all directions and must be located at least 1000 mm away from the tank surfaces adjacent to vehicle use if tank is installed adjacent to surfaces which are used by heavy vehicles, the minimum distance away from these surfaces should be at least the depth of ehe trench
سطح شیبدار
از نظر آماری دیوار نگهدارنده محاسبه شده باید فشار وارد شده از سوی خاک را جذب کند. دیوار باید با رعایت فاصله 500 تا 1000 میلیمتری از تمام زوایای اطراف مخزن ساخته بشود. چنانچه مخزن در نزدیکی محل عبور و مرور وسایل نقلیه سنگین مدفون شده است، فاصلهای به ازای حداقل عمق حفره با محل عبور ماشینها در نظر گرفته شود.
water impermeable soils
if tank will be immersed deeper into the groundwater than is shown in the adjacent figare. sufficient dissipation must be ensured.
خاکهای مقاوم در برابر آب
برای جلوگیری از هدر رفتن انرژی مانع غوطه ور شدن مخزن در اعماق آبهای زیر زمینی (باران) شوید.
جهت سفارش و خرید دستگاه پکیج گرمایشی روی لینک کلیک کنید.
No comment